Haleem and Naan
Welcome to a culinary journey where we explore the rich and aromatic flavors of Haleem and Naan. This classic Pakistani duo brings together the hearty, spiced goodness of haleem, a slow-cooked meat and lentil stew, with the soft, perfection of freshly baked naan bread. Whether you’re preparing a festive meal or a regular dinner, our step-by-step guide will help you master the art of making Haleem and Naan, delighting your taste buds and impressing your guests with this aromatic, flavorful dish.
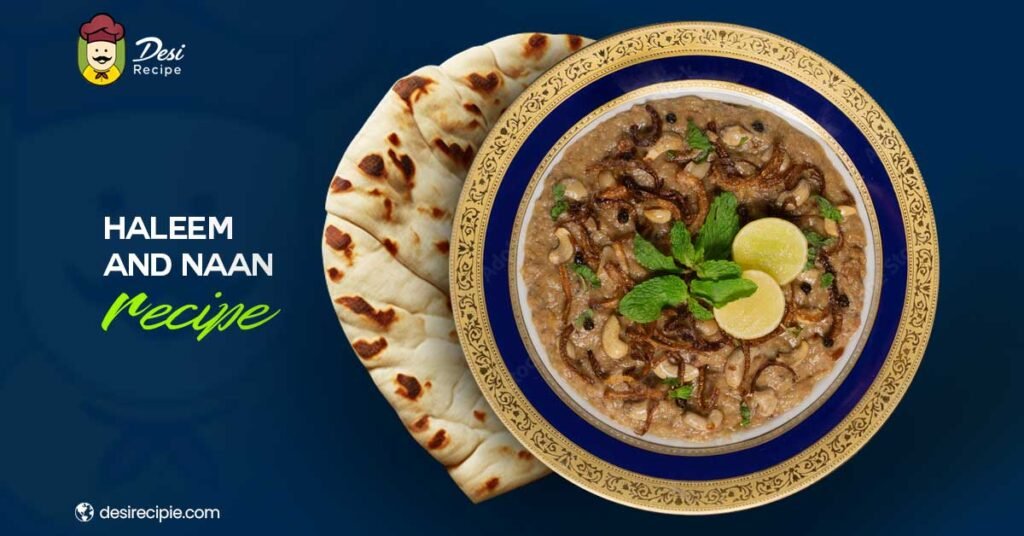
Pakistani Chicken Haleem and Naan Recipe
Description
"Embark on a culinary journey with our authentic haleem and naan recipe. This comprehensive step by step guide will lead you through cook a rich and flavorful chicken haleem, simmered to perfection with spices and lentils, and baking soft, fluffy naan bread. Whether for a festive feast or a comforting family meal, this recipe brings the traditional and mouthwatering flavors of haleem and naan right into your kitchen, ensuring a delightful and memorable dining experience."
Ingredients
Haleem Recipe
Naan Recipe
Instructions For Pakistani Chiken Haleem And Naan Recipe
-
For Chicken Haleem
-
Wash the lentils and broken wheat thoroughly. Soak them separately for a few hours or overnight.
-
In a large pot, heat oil or ghee. Add the chopped onions and sauté until golden brown.
-
Add ginger-garlic paste and sauté for a minute until fragrant.
-
Add the chicken pieces and cook until they turn white.
-
Add turmeric powder, red chili powder, garam masala, and salt. Mix well.
-
Pour in 6-8 cups of water and bring the mixture to a boil. Reduce the heat to low, cover the pot, and let it simmer for 4-5 hours. Stir occasionally to prevent sticking.
-
Use a wooden spoon or a hand blender to blend the mixture until you achieve a smooth and thick consistency.
-
Check for seasoning and adjust if needed. If the haleem is too thick, you can add more water and cook for a little longer.
-
Serve the haleem hot, garnished with chopped fresh coriander leaves, julienned ginger, and lemon wedges. Accompany it with naan or other flatbreads.
-
-
For Naan
-
In a small bowl, combine yeast, sugar, and 1/4 cup warm water. Let it sit for 5-10 minutes until frothy.
-
In a mixing bowl, combine the flour and salt. Add the activated yeast mixture, yogurt, and melted ghee/butter.
-
Gradually add water and knead to form a soft and smooth dough. Cover the dough with a damp cloth and let it rest in a warm place for about 2 hours or until it doubles in size.
-
Preheat a tawa or griddle over medium-high heat.
-
Divide the dough into small balls. Roll out each ball into an oval or round shape.
-
Wet one side of the naan with water and place the wet side onto the preheated tawa. Cook until bubbles form on the surface.
-
Flip the naan and cook the other side until it puffs up and gets golden brown spots.
-
Remove from the tawa and brush with melted ghee or butter.
-
Serve the naan warm alongside the flavorful haleem.
-
Pro tips for Making Haleem
-
Lentil-Wheat Soaking Magic
Variety Matters: Use a combination of lentils like chana dal, moong dal, and masoor dal for a rich and complex flavor profile. Soak them with broken wheat (dalia) to create a thick and hearty consistency.
Extended Soaking: Soak the lentils and broken wheat for at least 4 to 6 hours, or ideally overnight. This softens the grains, reduces cooking time, and aids in achieving a smoother texture.
Mastering the Meat
Marination Wisdom: Marinate the boneless chicken pieces with a mixture of yogurt, ginger-garlic paste, and a touch of turmeric. This not only adds flavor but also helps in tenderizing the meat, ensuring a succulent and melt-in-the-mouth texture.
Layered Flavors: To infuse the meat with depth, consider marinating it a few hours before cooking. Allow the flavors to penetrate the chicken, resulting in a more pronounced taste in every bite.
Slow and Steady Wins the Taste Race
Low and Slow Cooking: Once the ingredients are combined, cook the Haleem on low heat. This gradual cooking process allows the lentils, grains, and meat to meld harmoniously, resulting in a rich and cohesive flavor.
Stirring with Care: Stir the Haleem intermittently to prevent it from sticking to the bottom of the pot. Gentle stirring ensures even cooking and prevents burning, adding to the dish’s overall taste and texture.
Texture Magic Through Blending
Balanced Blending: After the ingredients are cooked through, use a hand blender to partially blend the mixture. This technique maintains the texture of individual components while creating a creamy and cohesive base.
Adjusting Consistency: If the Haleem seems too thick, add a bit of water and blend again until you reach your desired consistency. The goal is to achieve a balance between smoothness and a hint of graininess.
Garnish Artistry
Vibrant Garnishes: Elevate the appearance and taste of your Haleem with an array of garnishes. Freshly chopped coriander leaves, vibrant ginger julienne, fried onions, and a drizzle of lemon juice all contribute to a multi-dimensional sensory experience.
Balanced Seasoning
Seasoning Gradually: Start with basic spices like ginger-garlic paste and whole spices. Gradually introduce ground spices like turmeric and garam masala as the Haleem cooks. This layering technique results in a well-balanced flavor profile.
Cooking with Love and Patience
Mindful Monitoring: While the Haleem simmers, periodically check for the consistency and stir gently. This patient approach allows the flavors to meld seamlessly and ensures each ingredient plays its part.
Serving Warmth
Temperature Matters: Serve Haleem piping hot. This helps release the full spectrum of aromas and intensifies the flavors. Presenting it at the right temperature enhances the overall dining experience.
Note
Pro tips for Making Naan
Yeast Activation Mastery
Yeast Check: Before using yeast, make sure it’s active. Dissolve it in warm water along with a pinch of sugar. If it becomes frothy within about 5-10 minutes, it’s ready to work its magic.
Warmth Matters: Ensure the water you use for yeast activation is comfortably warm, not too hot or too cold. Extreme temperatures can affect yeast performance.
Dough Consistency Craftsmanship
Soft and Supple: Knead the naan dough until it’s soft, smooth, and elastic. The more you knead, the better the gluten develops, resulting in soft and airy naan.
Don’t Overdo It: While kneading, be cautious not to overwork the dough. Over-kneading can make the naan tough instead of tender.
Resting Time Brilliance
Rest for Flavor: Allow the naan dough to rest and rise for at least 2 hours. This resting period allows the gluten to relax and develop, which contributes to a better flavor and texture.
Cover the Dough: While the dough is resting, cover it with a damp cloth or plastic wrap. This prevents it from drying out and creates a perfect environment for rising.
Proper Rolling Techniques
Rolling Balance: Roll out the naan dough into oval or round shapes. Avoid rolling them too thin or too thick—aim for a balance that ensures both puffiness and tenderness when cooked.
Even Thickness: Roll the dough evenly to ensure consistent puffing during cooking. An unevenly rolled naan may cook unevenly as well.
Tawa Temperature Expertise
Preheat Right: Preheat your tawa or griddle over medium-high heat. A properly heated surface ensures even cooking and that characteristic bubbly texture on the surface of the naan.
Test the Heat: Sprinkle a few droplets of water on the tawa—if they sizzle and evaporate immediately, the tawa is ready for cooking.
Butter Brushing Elegance
Buttery Bliss: As soon as you take the naan off the heat, brush it with melted butter or ghee. This not only adds a wonderful flavor but also keeps the naan soft and luscious.
Cooking Mastery
Flipping Finesse: Once you place the naan on the tawa, wait until you see bubbles forming on the surface. This is the cue to gently flip it and cook the other side.
Pressing Technique: To encourage even puffing, you can lightly press the edges of the naan with a spatula while cooking.

